Pattern: Inside Out Hat With Pom Pom


Finished Measurements:

21 inches circumference
8 inches tall (without pom pom)


Materials:

Color A: One (1) skein bulky yarn, Forest Green
Color B: One (1) skein bulky yarn, Off White
Size 8 circular needles
Size 8 double pointed needles
Scrap piece of cardboard

Gauge:

11 stitches, 16 rows = 4 inches
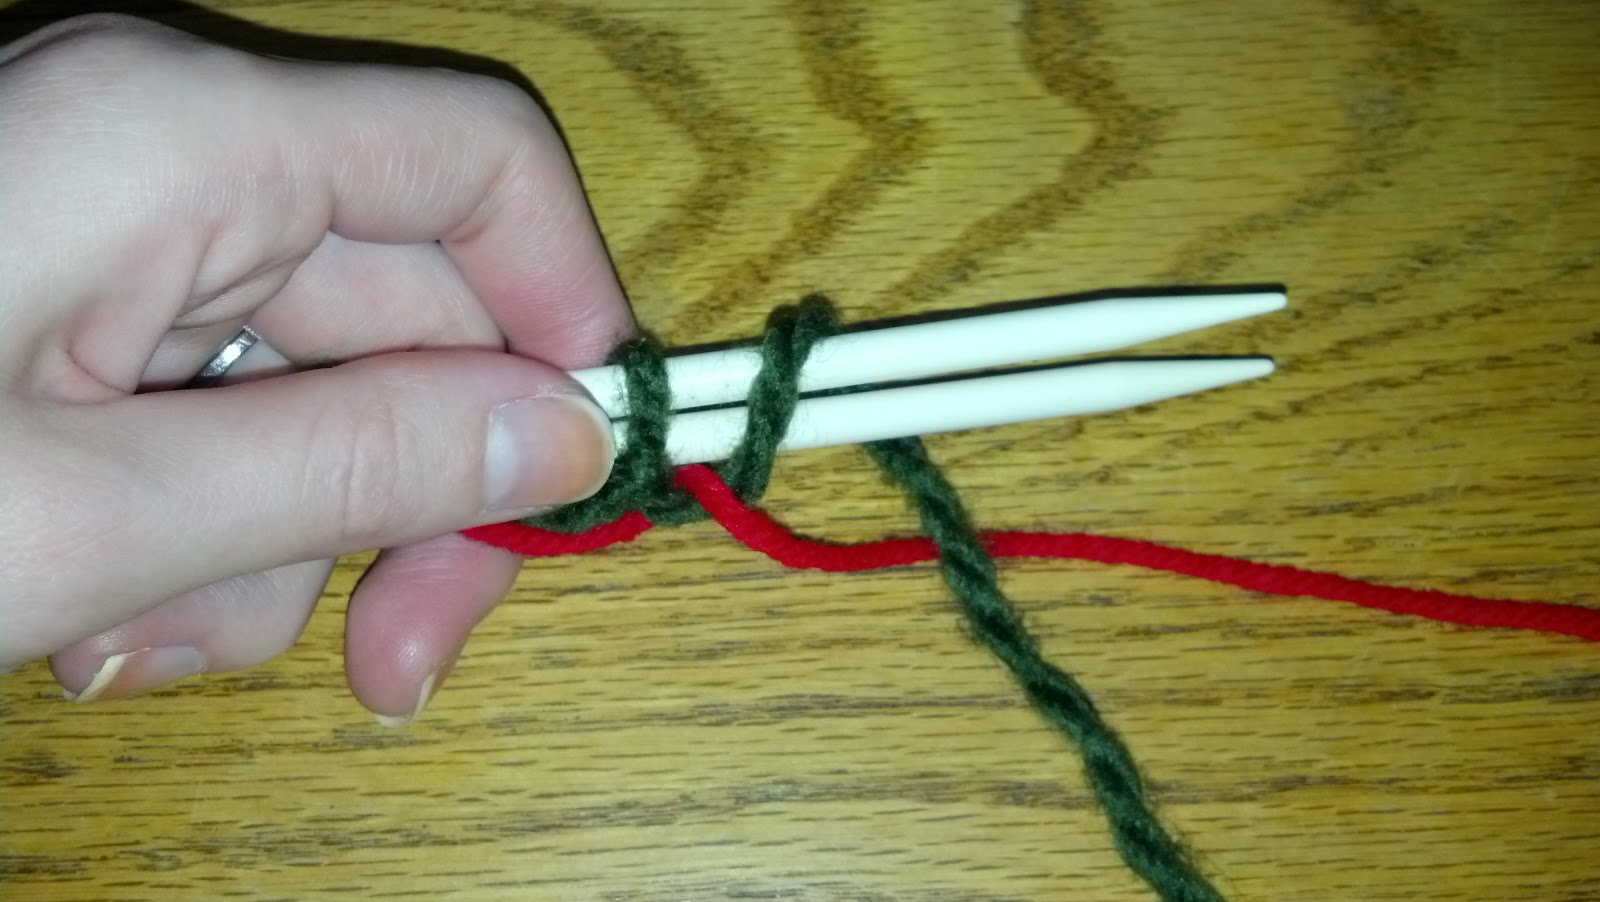
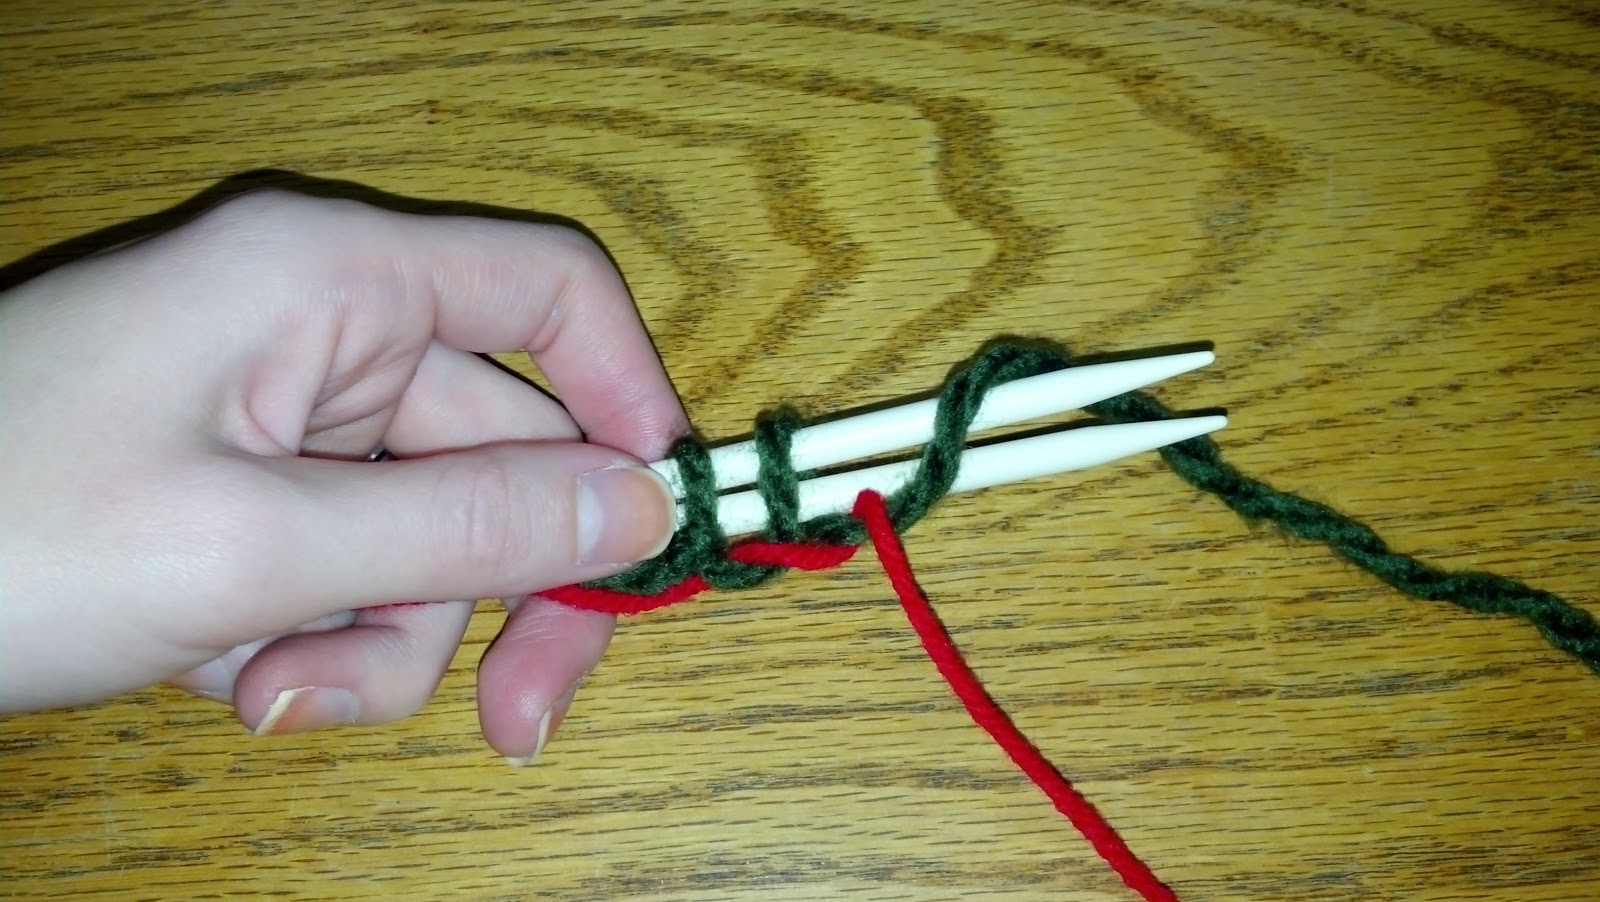
Instructions:

Brim:
With Color A and double pointed needles, Cast On 10 sts using the provisional cast on method, instructions available here.
Round 1: Knit
Repeat Round 1 for 136 rows, or until work measures 21 inches

Holding the two needles of live stitches parallel, graft the two live ends together to make the lower brim of the hat, instructions available here.


Hat Base:
Change to Color B. Use circular needles.
Pick up and knit 70 stitches along the edge of the hat brim.
Round 1: Purl.
Round 2: *K1, P1.* Repeat from * to *
Repeat Round 1 and Round 2 until hat measures 6 inches from the beginning.


Hat Top:
Round 1: *P2, P2tog.* Repeat from * to * until 2 sts remain. P2.
Round 2: *K1, P1.* Repeat from * to * until 1 st remains. K1.
Round 3: *P1, P2tog.* Repeat from * to * until 2 sts remain. P2.
Round 4: *K1, P1.* Repeat from * to *
Round 5: *P2, P2tog.* Repeat from * to * until 2 st remain. P1.
Round 6: *K1, P1.* Repeat from * to *
Change to double pointed needles.
Round 7: *P1, P2tog.* Repeat from * to *
Round 8: *K1, P1.* Repeat from * to *
Round 9: P2tog across. 9 stitches remain.
Break yarn leaving a 16 inch tail. Draw yarn through remaining stitches, removing needle and pulling tight. Fasten off on wrong side of cap.


Pom Pom:

Change to Color A.
Use scrap piece of cardboard and follow these helpful instructions to make and attach pom pom, if desired.

Lesson: Kitchener Stitch (Knit)

Learn how to do the kitchener stitch, or graft two ends together, to seamlessly attach two ends of a piece together.

Materials:
Two needles with live stitches to graft together
One sewing needle

Instructions:

Thead the sewing needle through the working yarn. Make sure that your needles have the same number of stitches.


Hold the two needles parallel and the needles pointing in the same direction, with the working yarn on the back needle. The right side (RS) of the work should be facing outwards (towards you).


The first two stitches are unique, then the rest follows a repetitive pattern.


Insert the needle into the first stitch on the front needle as if to purl. Leave that stitch on the needle.

Insert the needle into the first stitch on the back needle as if to knit. Leave that stitch on the needle.

Now that you have your first two stitches set up, the repetitive pattern begins.

*Insert the needle into the first stitch on the front needle as if to knit. Slip that stitch off the needle.
Insert the needle into the (new) first stitch on the front needle as if to purl. Leave that stitch on the needle.
Insert the needle into the first stitch on the back needle as if to purl. Slip that stitch off the needle.
Insert the needle into the (new) first stitch on the back needle as if to knit. Leave that stitch on the needle.*

Repeat from * to * until you have worked all of the stitches.


Congratulations, you have seamlessly attached two ends of your piece together!


So much to do, so little time....


As always it’s all go here at JANIE CROW and in the lead up to Christmas things are no different – in fact it’s all getting a bit ridiculous! As always I have given myself far too much to do over the next few weeks and have a list as long as my arm of things that need to be done in time for the BIG DAY. I do this every year – overload myself with an impossible number of things, all of which need to be juggled about and squeezed in so that we can enjoy a few days of holiday over the festive season without having to think of anything work related.


 I have a few knitting projects I want to complete (not least because one of them is supposed to be my mum’s Christmas present); I need to finalize the design for the crochet club 2013 project and get the first set of patterns off to Erica to check; I have projects to design for the series of new workshops that I will be tutoring at The Hertfordshire Craft Collective in the New Year and I have a commission design to think about. Alongside all the crochet and knit ‘things to do’ I have the Christmas food prep to think about, the present shopping to do (as yet I have only bought 5 presents) and, as if this wasn’t enough, I have decided to decorate the living room!

I am sure I am not alone in overloading myself with things to do over the next few weeks. Christmas is an ideal opportunity to set a fantastic deadline, after all, what could be nicer than starting a whole New Year with a clean slate and a whole new list of things to do? Having deadlines and working on a tight schedule is a good thing, but the fact that I always decide to add something ridiculous into the mix is just so annoying - and to make it worse I do it every year!

The stupidity of the decision to do some decorating over the next few weeks is the thing that is in danger of tipping me over the edge - especially as I got a bit carried away with my great idea and tore quite a large amount of wall paper away from the wall, revealing cracked plaster and a rather large hole! There is another daunting looking bit of dodgy ceiling coving that obviously (now I look at it a bit more closely) needs rather a lot of attention and the 1970s ‘Anaglypta’ ceiling paper is even more of a sod to paint than I had remembered!

Overtly Olive Paint - Dulux

Delphine Wallpaper Nina Campbell

Of course I’ve sorted all the nice bits – the lovely wallpaper that I want to hang on the chimneybreast is here, the new glass fire screen has arrived, I have decided on the new floor lamp and I have chosen the shade of paint. I’ve got the fabric for the new Roman blinds and have been looking through flooring catalogues. It’s all going to look so lovely when its done, especially as I am planning to have some of my knitted cushions scattered about  – but before I get to play with the ‘nice bits’ I need to do the horrible bits = the painting, the sticking, the cleaning, the sawing and the sewing. Ugghh!

Cushion Collection

Echino Fabric For Roman Blinds

A week on from my first day of decorating I can see that I have a mammoth job ahead of me. There is so much to do and less and less time in which to do it. Unfortunately I also have less and less enthusiasm and energy and so have become an expert in distraction tactics. Rather than get on with the decorating or one of the jobs on my list I have been crocheting these lovely baubles designed by Greta Tulner of Atergcrochet. I really love her cute little designs and these are just so lovely to do. Making these is a lovely way of playing with yarn colours and using up small bits and bobs from my stash. I have been using the Rico Essential Cotton that I bought at Manfield Crafts a couple of weeks ago – I’m really impressed by this yarn, the colours are fantastic and it has a really good feel, especially considering it is such good value at just over £2 for a 50g ball.

Atergcrochet Baubles

Pouch and Wrap Collection


Amazingly (amongst all the chaos I have created recently) Andy and I have finally got around to adding the JANIE CROWrange of wraps and pouches to the web site. Just in time for Christmas, these handmade pieces of loveliness would make a great present for any knitter or crocheter. We have 3 sizes of project pouch - small, medium and large - and 3 wrap sizes – crochet hook, dpn and straight knitting needle. All pieces are hand made in the UK from vintage woollen felted blankets and have velvet ribbon and a crochet flower detail. All pieces are ‘one offs’, so we have had to add them to the site one at a time. There are only about 12 left so you need to be quick if you fancy one, although we do hope to put some more on the web site soon and if you place any web site orders between now and the 18th December and your total spend comes to more than £50 we will send you one of my crochet baubles by way of a ‘thank you’ (this gives me the excuse to make even more and ignore the decorating for even longer!)

Better go and at least take a look at the mess I have created in the living room before I settle down for my day of crochet. Perhaps we could start a wager on whether or not I get it all done in time – odds in my favour are not good!

Lesson: Provisional Cast On (Knit)

This method of casting on allows you to work live stitches from both ends of a piece. Use a scrap of waste yarn to hold live stitches while you knit in the opposite direction, allowing you to pick up these live stitches to work with later.

Uses:
  • Attaching the ends of a piece together without an unsightly seam
  • Hemming or edging
  • Working a piece when you are unsure how far your yarn will go
Materials:
  • One needle at least two (2) sizes larger than the needle size your project calls for OR two needles held together that are the same size that your project requires.
  • Scrap of waste yarn, longer than the length of the stitches you want to cast on.
  • Working yarn
Instructions:

Make a slip knot. Leave a small tail. Work the yarn from the skein.
Hold the end of the scrap yarn in the same hand as the needles. (Leftie for me!)
*Move the working yarn in front of the waste yarn. 
Move the working yarn under the waste yarn.
Move the working yarn in front of and over the needle.*
Repeat from * to * until you have the required number of loops of working yarn on the needle. Here's what it looks like a few stitches in:

Move the working yarn in front of the waste yarn. 
Move the working yarn under the waste yarn.
Move the working yarn in front of and over the needle.
You should have an equal number of stitches around the waste yarn as you have on the needle.


End by moving the working yarn in front of and under the waste yarn.
Your work should look like this after removing the needles, leaving only the waste yarn, and working a few rows
When you want to use the live stitches on the waste yarn, just pick them up on a new needle and remove the waste yarn. Make sure you pick up the same amount of stitches you cast on.

Tips:

  • Keep waste yarn taught as you work the first few rows so the live stitches, on the ends especially, don't unravel.
  • It's OK if your live stitches on the waste yarn are loose while on the waste yarn. This should go away when you pick them up and work with them.

Lacy Waves Afghan (Knit)

Here is a soft knit afghan using Loops & Threads yarn:


Materials:

Ten (10) skeins Loops & Threads Country Loom, in Warm Cream
         I used more yarn than the pattern called for to make it larger
Size US17 (12.75 mm) circular needles 
       I used a larger needle than the pattern suggested to make the loops bigger and the pattern looser

Final afghan measures seven (7) feet by five (5) feet

Instructions:

Available here


This pattern is labeled intermediate but it is an easier pattern to try for those who want to venture away from a basic knit and purl pattern. Follow a simple 16 row repeating pattern to make the wavy diamond shapes.


The afghan has a nice finished edge all around the four sides using the Picot Cast Off. Don't skip this step, it really makes the blanket!

Go Green! Plastic Bag Holder (Crochet)

Ever wonder what to do with all those excess plastic bags from the grocery store? Crochet this wonderful plastic bag holder:


While we all aspire to be great environmentalists, no one is perfect and we all forget to bring that re-usable bag to the store once and awhile. But don't throw those bags away! Re-use them with this handy plastic bag holder.


Make sure to use a cheap acrylic yarn - sorry if that makes some of you cringe - to ensure durability. It also helps the holder keeps its shape consistently, no matter how many or how few bags you have in it.


The blue and green vertical stitches (called a front post double treble crochet, instructions available here) hide any small bumps the plastic bags inside may cause, making it more appealing to the eye. Ties at the top and bottom ensure the plastic bags stay put.


Sure, it looks a little derpy and it's probably not something you'll want as a centerpiece at your next party. But it's perfect to hang away in the pantry and reduce your shelf clutter (because we all know how guilty you feel just throwing those plastic bags away). Re-use them as trash bags for small garbage cans. Happy recycling!

Feeling all Christmassy!


I had another lovely day at Manfield Crafts in Rushden yesterday with a group of 11 lovely knitters, shop owner Emma and her trusty assistant Deborah. I have said before how lovely the shop is and how great Emma is at making all her yarns and projects look scrumptious. Walking into the shop yesterday was like walking into a knitters Christmas wonderland. I knew already that it was bound to be lovely in there this time of year and of course it did not disappoint. Emma has lovely knitting kits for all things Christmassy, including knitted wreath and bauble kits, heart kits and even a lovely knitted Angel kit. If you’re looking for gifts for friends who knit, or fancy treating yourself in advance of all the hard work that needs to be done over the festive season, then look no further than Emma’s shop!


One of my workshop attendees had brought along her version of my LOVE panel, which was one of the projects in the 2012 Bead Club run by Steve at Debbie Abrahams beads. It’s always lovely to see the projects that people make and it makes me very proud when I see my designs reproduced. Shelagh made her panel into a cushion and I think it is so great that I am going to have to make myself another one!! There are still places left on the bead club, so if you would like to make the LOVE panel along with the other exclusive beaded knit projects then check out Steve’s web site by clicking here.


I had been invited along to tutor a Christmas knitting workshop, so I took along a small project for the group to do in the shape of a Fairisle Christmas Cracker. I had a great group of knitters, many of them already knew each other, but not all of them had tackled the Fairisle technique before. Because the pattern was designed in a way that did not need large amounts of weaving in, I managed to get a lot of the group to try the two handed Fairisle method, where a single shade of yarn is held and knitted from each hand. If you can crack this technique it makes things so much easier, especially when working in the round.


Inspired by Debbie’s Norwegian bag project, which my group made on the Norway cruise a few weeks ago, this small Christmas cracker is made in double knitting yarn and is the perfect introduction to learning Fairisle. By the end of our workshop day, half the group at least had completed their pieces ready to head home and wrap around their Smartie chocolate tubes. The cracker would make a great tree decoration, a small gift or a table favour.

If you would like to knit the cracker you can download the free pattern here

You will need:
Approx 25g DK yarn in cream and black
Small amount DK yarn in red – enough for 4 rows
3.25mm needles
4mm needles
Knitters Sewing Needle
Approx 80cm ribbon

Note: the tension on the piece is tight so that the Fairisle keeps neat and sturdy.


After a great day with lots of lovely knitters I endured the delights of roadworks on the M1 on my journey back and arrived home 2 and a half hours later, more than a little hot under the collar (journey should have taken hour and a half tops!), but look what delights had made their way into my bag to perk me up on my return home! Cant wait to get stuck into this lovely Rico cotton - my goodness the shades are just so scrumptious!