Shetland Trip

I was once again invited to tutor a knitting workshop in Shetland with Arena Travel back in May. Ive been home a few weeks now, but keep thinking about what a fabulous time we had!

I adore Shetland and couldn't wait to get there this year, especially after the disappointment last year when the trip was abandoned due to bad weather. I went with a group of 14 knitters and our tour guide Caroline and we had good weather pretty much the whole time this year and only had a few drops of rain towards the end of our stay, the rest of the time it was dry, warm and bright.

We had a packed schedule and first on the agenda was a morning knitting workshop where I revealed the project for the week which was a fair isle and lace bag. The aim of the first workshop was to introduce participants to the 2 handed fair isle method.


In the afternoon we visited the Jamieson & Smith HQ in Lerwick where we were given a presentation by Director Oliver Henry. Oliver told us about how the fleeces are graded and how the yarn is produced. We were shown the lovely new yarn called 'Shetland Heritage' which we all fell in love with. Its really soft and comes in 11 traditional Shetland shades.


We spent rather a lot of time in the Jamieson & Smith shop where they had all their amazing yarns and patterns on display and for sale. Everyone had a lovely time looking at all the shades and we all did a little retail therapy!

We spent our second day at the Shetland Museum Archives where we were shown round the knitting and spinning areas with a guide. We were lucky enough to be given a spinning and knitting demo and a few of the group had a go at using the traditional knitting needles and knitting belt.


We spent some time in the afternoon at the Shetland Textile museum where we met the fastest knitter in the world Hazel Tindall and did a little more retail therapy. I bought this lovely fair isle chicken made by Polecraft


We had a full day workshop on Sunday - some of the group went on a boat trip for part of the day and they saw lots of wildlife and birds, including puffins and seals, although we could walk down and see the seals on the beach near the hotel any time we wanted. The scenery on Shetland is just beautiful and I'm not sure I've ever been to anywhere that the views have me quite so enthralled, watching the sun and shadows of the clouds on the sea and the land is mesmerising - and it doesn't really get very dark in the summer time so even at night there is a light on the horizon.


On our final day we had a lace workshop and we also made some dorset buttons which are always good fun to do. The image below shows the lace trim for the bag being blocked. I always soak my knitted pieces for a while before I put them together - soaking makes a massive difference to wool in particular and is in my view imperative to a good finish.


We spent our final afternoon visiting some local studios and touring the island a little. We had a lovely visit to Shetland Handspun where Elizabeth talked us through her spinning process and showed us her beautiful hand knits.


We also visited Neilanell's studio shop. I bought 2 pieces from her collection last time I visited Shetland and had promised myself not to buy anything new, but in the end I couldn't resist - Neilanell's designs are just so gorgeous, Im not sure that any of us left the store without a purchase!


As with all the Arena tours its always sad when it's time to go home, but we had an amazing trip and made some great friends. We also ate some wonderful food in the bistro at the hotel and I came home a good few pounds heavier, but my wallet was definitely lighter so at least there was balance!

If you fancy coming on an Arena tour, the next one I will be tutoring will be to Norway in March next year. You can find more information here


Pattern: Trailing Flowers Beach Cover Up

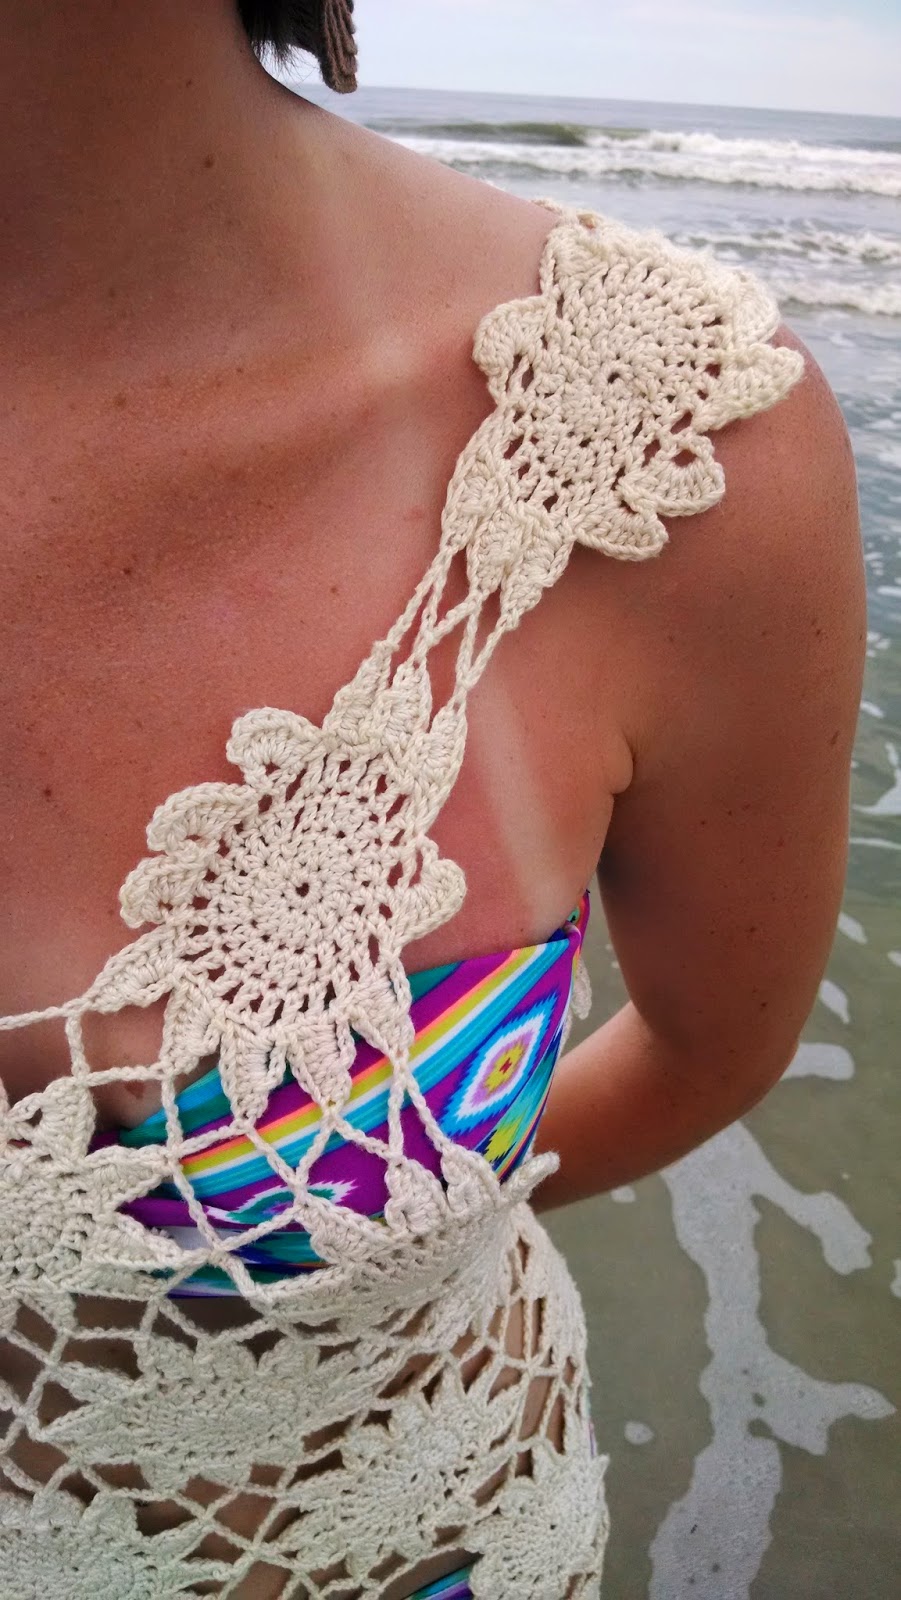
This crochet beach cover up is perfect for your next trip to the beach. Think of this as a pattern recipe to make a cover up that fits your body as snug or loose as you want.

The bottom of the cover up has alternating green and orange flowers with these colored flowers trailing up the spine. The piece is worked from the bottom up.


Note: when counting the flower petals in this pattern, work clockwise.


Materials:

6 skeins Aunt Lydia’s Crochet Thread, Fashion 3, in Natural
1 skein Aunt Lydia’s Crochet Thread, Fashion 3, in Copper Mist
1 skein Aunt Lydia’s Crochet Thread, Fashion 3, in Sage
Size D crochet hook

Finished Measurements:

34" long
Snugly fits a women's size small

Instructions:

Spine
Work the flowers for the spine first. 

Using magic loop method, 8 sc.
Round 1: Ch 3 (counts as 1 dc), 1 dc in first st, 2 dc in each st across the next 6 sts, turn (14 sts total).
Round 2: Ch 4, *1 dc in next st, 1 ch.* Repeat from * to * until end, turn.
Round 3: Ch 3, *1 dc in next st from Round 2, ch 3, 6 dc down the 1 dc from this Round, sl st in next st from Round 2.* Repeat from * to * until 4 more times (5 petals total), ch 8, sl st in starting ch from previous Round.

Rounds 1-3 completes one half flower. The final ch 8 from Round 3 makes up the magic loop starting round for the rest of the half flowers so they are attached.

Work one half flower in green, then work the next half flower in orange. The finished product has all orange flowers on one side and all green flowers on the other side. Continue working the flowers until you reach your desired length. Mine uses 20 spine flowers total. 

The top of the flowers will rest between your shoulder blades and the bottom will rest approximately 2.5" from the end of the piece. There will be an additional edge on the bottom.

Bottom Edging
The bottom edge flowers alternate green and orange, but make a full circle with the petals, as opposed to a half circle of petals with the flowers trailing up the spine. Written instructions are below:

Round 1: Using magic loop method, 8 sc

Round 2: Ch 3 (counts as first dc), 1 dc in next st, 2 dc in next st and in each st until the end, sl st to join. (16 sts total)
Round 3: Ch 4, dc in next st, *ch 1, dc in next st,* repeat from * to * until end, ch 1, sl st to join.
Round 4: Make petal the same as in the spine flowers and continue until you have 8 petals total.

For my size, I made 13 flower motifs. To join, attach the first petal of one flower to the sixth petal of a second flower, and attach the second petal of that same one flower to the fifth petal of the second flower. This leaves two petals unattached on the top and two petals unattached on the bottom of each flower.


To join the bottom edge to the trailing spine of flowers, join the third petal of one bottom edge flower to the bottom petal of the first flower in the spine.

Body Flower Motifs
The flowers on the body are white and are one round larger than the bottom edging flowers.

Round 1: Using magic loop method, 8 sc
Round 2: Ch 3 (counts as first dc), 1 dc in next st, 2 dc in next st and in each st until the end, sl st to join. (16 sts total)
Round 3: Ch 3 (counts as first dc), 1 dc in first st, *1 dc in next st, 2 dc in next st,* repeat from * to * until end, 1 dc in last st, sl st to join. (24 sts total)
Round 4: Ch 4 (counts as first dc and first ch), dc in next st, *ch 1, dc in next st,* repeat until end, ch 1, sl st to join.
Round 5: Make petal the same as in the spine flowers and continue until you have 12 petals total.

Body Motif Joining

To attach the flowers on the body, work 5 ch between a petal of one flower and a petal of a second flower.

Starting with the bottom edging flowers, sl st in third petal of edging flower (also the same flower with joined spine flowers), ch 5, sl st in fourth petal of edging flower, ch 5, sl st in joined petals of two flowers, ch 5, sl st in third petal of next flower, ch 5, join to first petal of white body flower, ch 5, sl st in fourth petal of edge flower.


Continue joining body flowers to edge flowers in this manner by working 3 sections of 5chs and sl st in next petal before attaching another body flower. For the 13 edge flowers, I attached 9 body flowers.

To join one row of body flowers to another row of body flowers, sl st in fifth petal of bottom row body flower, ch 5, sl st in eleventh petal of body flower in top row, ch 5, sl st in sixth petal of bottom row body flower, ch 5, sl st in tenth petal of top row body flower, ch 5, sl st in seventh petal of bottom row body flower, ch 5, sl st in third petal of next top row body flower, ch 5, sl st in eighth petal of bottom row body flower, ch 5, sl st in second petal of top row body flower, ch 5, sl st in ninth petal of bottom row body flower, ch 5, sl st in first petal of top row body flower, ch 5.

Continue attaching the body flowers in the same manner. Attach the body flower rows to the spine flowers as you go. The height of one row of body flowers is equal to the height of one green spine flower and one orange spine flower.


To add a little shape, decrease by one body flower motif as you go up the rows. 

Row 1 of body flowers: 9 motifs
Row 2 of body flowers: 8 motifs
Row 3 of body flowers: 7 motifs
Row 4 of body flowers: 6 motifs
Row 5 of body flowers: 6 motifs
Row 6 of body flowers: 6 motifs - this row will make up the bottom of the armholes. 
Row 7: attach one body flower motif on either side of the spine flowers. Attach three body flower motifs in the same row to the four front body motifs of the sixth row. Do not attach the motifs on either side of the spine to the front three motifs.

Row 8 (back shoulder): working in the back only, attach one motif on either side of the spine. Work a half flower for either side of the shoulder in the same manner as the spine motifs, but with an additional row like the body motifs to they are larger (6 petals total).


Row 9 (front shoulder): working in the front only, work one body flower motif on either shoulder and attach to Row 8.


Notice how there is a gap between the flower motifs in a row between the fourth petal of one flower and the tenth petal of another flower. You can either leave this gap open or you can close it by doing the following:


Ch 4 between the tenth petal of the first flower and the fourth petal of the second flower. Sl st in ninth petal of first flower, ch 5, sl st in ch 4 space, ch 5, sl st in fifth petal of second flower. Sl st in eleventh petal of first flower, ch 5, sl st in ch 4 space, ch 5, sl st in third petal of second flower.


I left the gap on the third row of body flowers, around where the stomach is, but filled in the gap on all other rows.


Good luck and enjoy! Please let me know if you have any questions. I may try to make a chart to make it easier to explain.


Find me on Instagram and tag me in your photos! I'd love to see your work. @knitabitcrochetaway

Girl Friday Sweater

Materials:
1 set straight needles US 8
1 set circular needles US 8 (for working the collar at the end)
4 skeins Ice Yarns, Feriye Ince Worsted in Light Brown
Sewing needle
Instructions:
Pattern available here. My sweater is in the S size and it fits very comfortably and isn't too tight. The pattern is worked flat in panel sections to make it have the perfect fit, though I don't generally like sweater patterns that I can't try on as I work. The sizing worked out really well on this pattern - no frogging here!

This sweater came out so nicely and the pattern repeat was easy to work with. The trickiest part was keeping consistent with the pattern near the edges of a panel, but as long as you keep track of what you do as you work the piece, it shouldn't be a problem.
Under the finishing section, the author recommends picking up 2 sts for every 3 rows for the collar, but I found that this made the collar much too tight and it made the sweater bunch up awkwardly. I picked up a st for every row along the collar and it fit perfectly.
I wanted to have lots of tiny buttons, so I made a button hole every 5 sts. Also, for such tiny buttons, I suggest BO only 2 sts for the button hole rather than the recommended 3 sts.

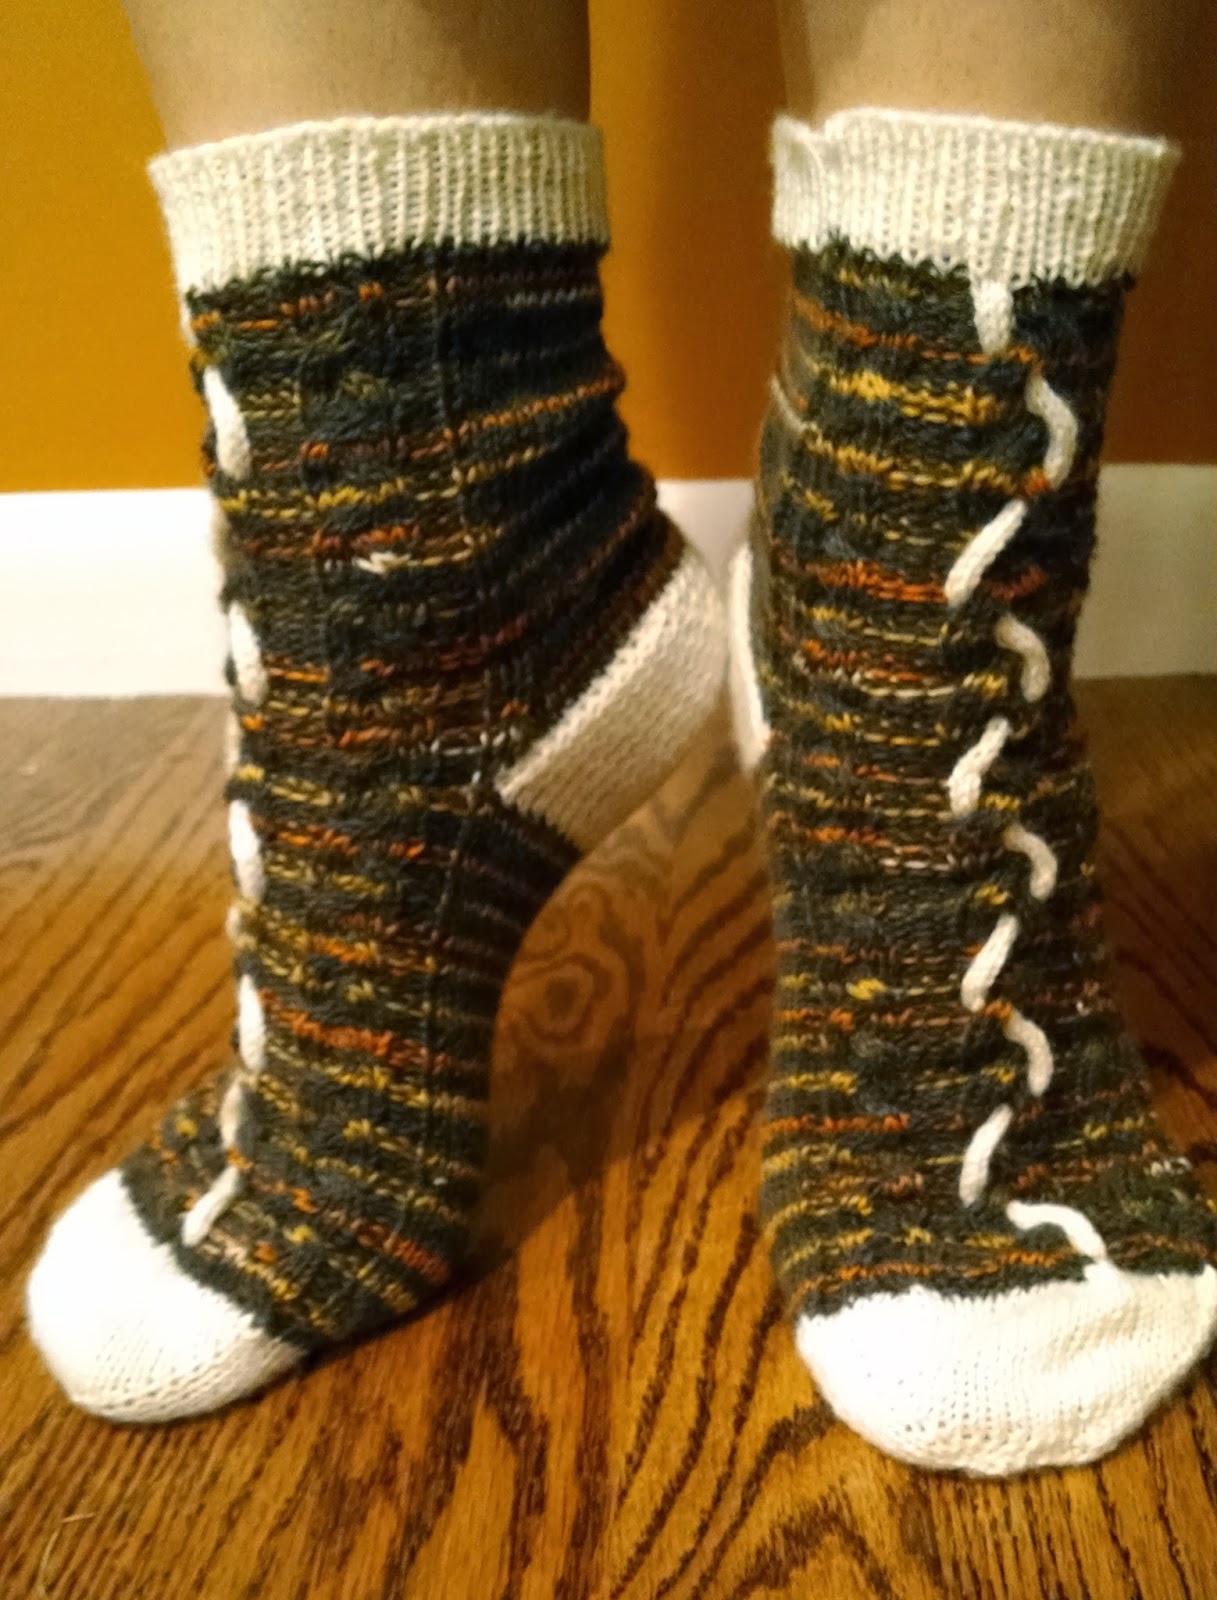
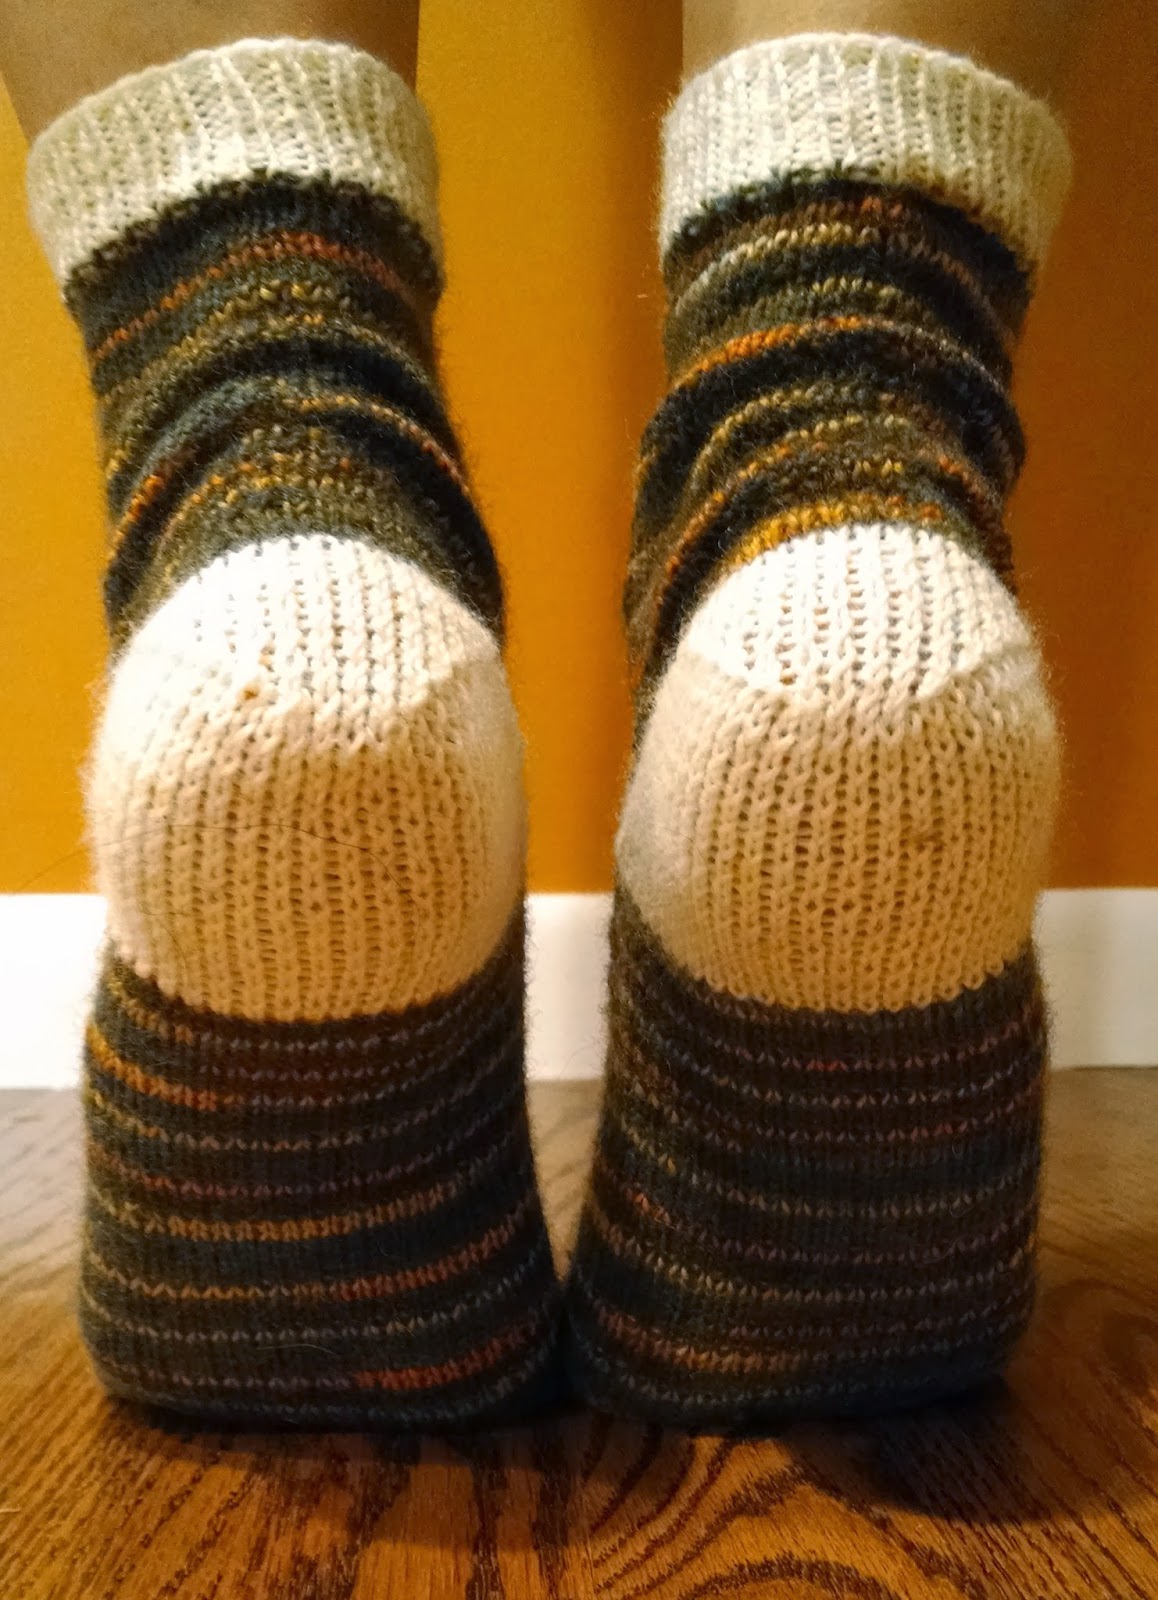
Pattern: Braided Cable Trail Toe Up Socks

Finished Measurements:
Pattern written for women's size 8 socks, but it is easily customizable to fit any foot size. 

Materials:
Size 1 double pointed needles
(MC) 1 skein Lion Brand Sock-Ease in Toffee - this yarn is great and has aloe infused in it!
(CC) 1 skein Premier yarns, Deborah Norville Collection, Serenity Sock Weight in soft white
Cable hook, or if you're feeling adventurous, I recommend watching this video to learn how to cable without the hook. It's really convenient for knitting on the go with limited supplies.

Abbreviations:
K - knit
P - purl
Sl - slip unworked stitch from left needle to right needle
SSK - slip unworked stitch from left needle to right needle knitwise. Slip a second unworked stitch from the left needle to the right needle knitwise. Slip those two unworked stitches separately back to the left needle purlwise. Knit those two stitches together in the back of the stitches (decrease).
K2tog - knit two stitches together (decrease).
P2tog - purl two stitches together (decrease).
Inc - knit into the front and back of the same stitch (increase).
Cn - cable needle
MC - main color
CC - contrast color

Braided Cable Knit Pattern:
This pattern repeats throughout the top of the sock, with the bottom of the heel and back of the ankle worked in stockinette stitch. Use the MC unless specifically noted to use the CC.

Row 1: P2, K6, P3, K3, K3 in CC, K3, P3, K6, P2.
Row 2: Repeat Row 1.
Row 3: P2, sl 2 front, K2, K2 from cn, K2, P3, sl 3 front, K3 in CC, K3 from cn, K3, P3, sl 2 front, K2, K2 from cn, K2, P2.
Row 4: P2, K6, P3, K3 in CC, K6, P3, K6, P2.
Rows 5-6: Repeat Row 4.
Row 7: P2, K2, sl 2 back, K2, K2 from cn, P3, K3 in CC, sl 3 back, K3, K3 from cn, P3, K2, sl 2 back, K2, K2 from cn, P2.
Row 8: P2, K6, P3, K3 in CC, K6, P3, K6, P3.

Row 9-10: Repeat Row 8.
Row 11: P2, sl 2 front, K2, K2 from cn, K2, P3, sl 3 front, K3, K3 in CC from cn, K3, P3, sl 2 front, K2, K2 from cn, K2, P2.
Rows 12-14: Repeat Row 1.
Row 15: P2, K2, sl 2 back, K2, K2 from cn, P3, K3, sl 3 back, K3, K3 in CC from cn, P3, K2, sl 2 back, K2, K2 from cn, P2.
Row 16: P2, K6, P3, K6, K3 in CC, P3, K6, P3.

Rows 17-18: Repeat Row 16.
Row 19: P2, sl 2 front, K2, K2 from cn, K2, P3, sl 3 front, K3, K3 from cn, K3 in CC, P3, sl 2 front, K2, K2 from cn, K2, P2.
Rows 20-22: Repeat Row 16.
Row 23: P2, K2, sl 2 back, K2, K2 from cn, P3, K3, sl 3 back, K3 in CC, K3 from cn, P3, K2, sl 2 back, K2, K2 from cn, P2.
Row 24: Repeat Row 1.

Instructions:
Toe Shaping
Using provisional cast on method, cast on 8 stitches
Round 1: P across
Round 2: K across
Round 3: P across
Round 4: K across

Remove live stitches from scrap yarn and place them on a double pointed needle. You should have 16 sts on two needles (8 sts per needle). Begin knitting in the round.

Round 5: *K2, Inc, K1 (add a needle) K1, Inc, K2.* Repeat from * to * (12 sts)

Round 6: Needle 1 - K2, Inc, K across needle
          Needle 2 - K across needle to last 3 sts, Inc, K2
          Needle 3 - K2, Inc, K across needle
          Needle 4 - K across needle to last 3 sts, Inc, K2

Repeat Round 6 until you have 32 sts total (8 sts per needle)


Round 7: K across
Round 8: Needle 1 - K2, Inc, K across needle
        Needle 2 - K across needle to last 3 sts, Inc, K2
        Needle 3 - K2, Inc, K across needle
        Needle 4 - K across needle to last 3 sts, Inc, K2

Repeat Round 7 and Round 8 until you have 60 sts total (15 sts per needle)


Round 9: K across
Round 10: Needle 1 - K2, Inc, K across needle
        Needle 2 - K across
        Needle 3 - K2, Inc, K across needle
        Needle 4 - K across 


At this point, you should have 62 sts total, with 16 sts on Needles 1 and 3, and 15 sts on Needles 2 and 4.

Foot:
For all foot rounds, work the Braided Cable Knit Pattern across Needles 1 and 2 and work the stockinette stitch across Needles 3 and 4. In other words, you will work the cable pattern over the top of the foot and stockinette stitch over the bottom of the foot.

Work the Braided Cable Knit Pattern 3 times for a size 8 woman's foot. For other sizes, work until the sock is the length from the toe to the bend of your ankle at the top of your foot.

Heel Flap:
Turn so WS is facing and Work Needles 3 and 4 ONLY (31 sts)
Leave Needles 1 and 2 unworked 
Use CC only

Row 11: Sl1, P across.

Row 12: Sl1, K3, P2, *K4, P2.* Repeat from * to * to end.
Repeat Rows 11 and 12, 11 more times (12 repeats total, 24 rows total).

Heel Shaping:
Row 13: Sl1, P15, P2tog, P1, turn. Leave remaining sts unworked. Continue in this manner.
Row 14: Sl1, K3, K2tog, K1, turn. 
Row 15: Sl1, P4, P2tog, P1, turn. 
Row 16: Sl1, K5, K2tog, K1, turn. 
Row 17: Sl1, P6, P2tog, P1, turn. 
Row 18: Sl1, K7, K2tog, K1, turn. 
Row 19: Sl1, P8, P2tog, P1, turn. 
Row 20: Sl1, K9, K2tog, K1, turn. 
Row 21: Sl1, P10, P2tog, P1, turn. 
Row 22: Sl1, K11, K2tog, K1, turn. 
Row 23: Sl1, P12, P2tog, P1, turn. 
Row 24: Sl1, K13, K2tog, K1, turn. 
Row 25: Sl1, P14, P2tog, P1, turn. 
Row 26: Sl1, K15, K2tog. Do not turn.

Begin working in the round again.

Round 27: Still using CC, pick up and K 12 sts along first side of the heel. Switch to MC and work in pattern across the two needles left unworked during the heel flap. Pick up and K 12 sts along second side of the heel. On the same needle, K 8 sts from the heel flap, splitting the sts from the heel flap between the two needles with the picked up sts. This is now the start of the round.

Gusset Shaping (decrease)
Round 28: Needle 1 - K across until last 3 sts, K2tog, K1.
       Needle 2 - Work in Braided Cable Knit Pattern.
       Needle 3 - Work in Braided Cable Knit Pattern.
       Needle 4 - K1, SSK, K across.

Round 29: Needle 1 - K across.
       Needle 2 - Work in Braided Cable Knit Pattern.
       Needle 3 - Work in Braided Cable Knit Pattern.
       Needle 4 - K across.

Repeat Round 28 and Round 29 until there are 62 sts total. Two needles should have 15 sts and two needles should have 16 sts.

Ankle
Continue working the Braided Cable Knit Pattern across the front of the ankle and stockinette stitch across the back of the ankle until you reach your desired length.

Ribbing
In CC, K1, P1 across for about an inch.
Cast off. Enjoy!

Imogen Blanket Kit


I often look to traditional designs when collecting ideas for new projects and I love trying to work out designs from old images, part written patterns and snippets of existing vintage crochet. In 2012 I decided to base my crochet club project on the Victorian era and focused particularly on lace designs. The pattern for the 2012 project is no longer available, but I get asked for it pretty much on a daily basis so it seemed logical to design a new project, which echoes the design themes used in the original project.


The Imogen Blanket uses brand new motifs and there are no repeats of pieces made as part of the 2012 project, however, the yarn palette, taken from the Rowan Cotton Glace range, is similar to that used previously. I really love the vintage feel of this blanket and wanted to echo the subdued rich yarn shades in my choice of Bronze beads from the Debbie Abrahams range, which are used on some of the motifs and as an accent on the lace border. There are just 2 motifs to master – the Princess Rose and the Victorian Daisy motifs and techniques used are relatively easy. If you haven’t crocheted with beads before you can find a demonstrative video (showing my hands threading the beads and incorporating them within the crochet fabric) on my web site along with more information about the kit.


The Imogen blanket kit uses 7 shades of Rowan Cotton Glace and the kit includes 18 x 50g balls along with the beads, ribbon and of course the pattern. The kit costs £99 (based on the recommended retail price of 18 balls of yarn at £5.50 each, so the beads, ribbon and pattern are included for free).  The pattern is not available separately at this time.


Pattern: Flower Motif Project Tote

I was inspired by some beautiful overlay crochet motifs I saw on Pinterest and decided to make a pattern of my own and put it on a cute tote to carry around my projects in progress. After ripping out too many different versions, enough that I could probably make a completely different flower motif, I settled on this design and absolutely love it. It's not as bulky looking as other overlay crochet motifs I have seen because it doesn't overlay multiple rows over the entire motif. I used the technique sparingly to give the flower some dimension.
The tote fits many skeins of yarn and needles very nicely. The stitches are tight enough that the needles don't fall out of any gaps. This was a very time consuming pattern to make so I posted it for sale in my Ravelry store - only $0.99! Available here.

Never fear, though, I'll still continue posting many free patterns on this blog.

Broken Seed Stitch Socks

Materials:
Size 1 double pointed needles
1 skein Lion Brand Sock Ease in Rock Candy
1 skein Premier yarns, Deborah Norville Collection, Serenity Sock Weight in soft white
Instructions:
There isn't a detailed pattern for these socks, but there is a "sock recipe" available here that is really easy to follow. I love that it is a sock recipe because I probably would have made them my way anyways (which is the way I make all of my socks).

I used the row up method below, working the entire toe, heel, and finishing edging in the white yarn only. I'm obsessed with these socks!
Toe Shaping
Using provisional cast on method, cast on 8 stitches
Row 1: P across
Row 2: K across
Row 3: P across
Row 4: K across

Remove live stitches from scrap yarn and place them on a double pointed needle. You should have 16 sts on two needles. Begin knitting in the round.

Round 5: *K2, Inc, K1 (add a needle) K1, Inc, K2.* Repeat from * to * (20 sts)
Rounds 6-8: Needle 1 - K2, Inc, K across needle
          Needle 2 - K across needle to last 3 sts, Inc, K2
          Needle 3 - K2, Inc, K across needle
          Needle 4 - K across needle to last 3 sts, Inc, K2

Increase until you have 32 sts total (8 sts per needle)


Round 9: K across
Round 10: Needle 1 - K2, Inc, K across needle
        Needle 2 - K across needle to last 3 sts, Inc, K2
        Needle 3 - K2, Inc, K across needle
        Needle 4 - K across needle to last 3 sts, Inc, K2

Repeat Round 9 and Round 10 until you have 64 sts total (16 sts per needle)


Foot
Work the pattern until the sock reaches the bend of your ankle at the top of your foot.

Heel Flap
Turn so WS is facing and Work Needles 3 and 4 ONLY (32 sts)
Leave Needles 1 and 2 unworked for the heel flap

Row 12: Sl1, P across.

Row 13: Sl1, K across.
Repeat Rows 12 and 13, 9 more times (10 repeats total, 20 rows total).

Row 14: Sl 1, P14, P2tog, P1, turn.
Row 15: Sl 1, K3, K2tog, K1, turn.
Row 16: Sl 1, P4, P2tog, P1, turn.
Row 17: Sl 1, K5, K2tog, K1, turn.
Row 18: Sl 1, P6, P2tog, P1, turn.
Row 19: Sl 1, K7, K2tog, K1, turn.
Row 20: Sl 1, P8, P2tog, P1, turn.
Row 21: Sl 1, K9, K2tog, K1, turn.
Row 22: Sl 1, P10, P2tog, P1, turn.
Row 23: Sl 1, K11, K2tog, K1, turn.
Row 24: Sl 1, P12, P2tog, P1, turn.
Row 25: Sl 1, K13, K2tog, K1, turn.
Row 26: Sl 1, P14, P2tog, turn.
Row 27: K across
Gusset Shaping
In white still, pick up and K13 sts along edge of heel flap. Now you should be at the same point in the sock where you left off with the other working yarn. This will be the starting point of your round (you may want to place a marker here, but I didn't find it was necessary because the second working yarn is always hanging out here).

Using the main color yarn, work in pattern across other 2 needles (the ones left unworked while making the heel flap). Pick up 13 sts along other side of heel flap and work pattern across. Continue working across the rest of the needles to complete the round.

Distribute heel flap sts evenly across two needles.

Decrease 2 sts every other row, one on either end of the heel flap sts, until you have 64 sts total again (16 sts per needle)

Leg
Continue working the pattern until you reach the desired length up your ankle.

Edging
K2, P2 across for about an inch, cast off.

Voila!